Hands-on Backend using Hono
Installing
npm create hono@latestyarn create honopnpm create hono@latestbun create hono@latestdeno run -A npm:create-hono@latestผมก็จะใช้ pnpm
❯ pnpm create hono hono
.../Library/pnpm/store/v3/tmp/dlx-30573  | Progress: resolved 1,.../Library/pnpm/store/v3/tmp/dlx-30573  |   +1 +
.../Library/pnpm/store/v3/tmp/dlx-30573  | Progress: resolved 1,.../Library/pnpm/store/v3/tmp/dlx-30573  | Progress: resolved 1, reused 0, downloaded 1, added 1, done
create-hono version 0.9.2
✔ Using target directory … my-app
? Which template do you want to use? nodejs
✔ Cloning the template
? Do you want to install project dependencies? yes
? Which package manager do you want to use? pnpm
✔ Installing project dependencies
🎉 Copied project files
จะได้ files แบบนี้
.
├── flake.lock
├── flake.nix
├── global.d.ts
├── package.json
├── pnpm-lock.yaml
├── README.md
├── src
│  └── index.ts
└── tsconfig.json`
Start Dev server
pnpm run devAdd route
ที่ไฟล์ src/index.ts
เพิ่ม route อันนึง
import { serve } from "@hono/node-server";
import { Hono } from "hono";

const app = new Hono();

app.get("/", (c) => {
  return c.text("Hello Hono!");
});

app.get("/healthz", (c) => c.text("Ok"));

const port = 3333;
console.log(`Server is running on port ${port}`);

serve({
  fetch: app.fetch,
  port,
});
เปิดใน browser
Add upload file routes
เราจะทำ route ที่เอาไว้รับการ upload file จาก frontend ใน hono ทำได้ง่ายมากๆ ไม่ต้องมี libs อะไรเพิ่มเลย
สร้าง folder /uploads มาก่อน
.
├── flake.lock
├── flake.nix
├── global.d.ts
├── package.json
├── pnpm-lock.yaml
├── README.md
├── src
│  └── index.ts
├── tsconfig.json
└── uploadsimport { serve } from "@hono/node-server";
import { Hono } from "hono";
import { writeFile } from "node:fs/promises";
import path from "node:path";
const app = new Hono();
app.get("/", (c) => {
return c.text("Hello Hono!");
});
app.get("/healthz", (c) => c.text("Ok"));
app.post("/uploads", async (c) => {
const body = await c.req.parseBody();
const file = body.file; // string | File
if (file instanceof File) {
const folder = "./uploads";
const fullPath = path.join(folder, file.name);
const arrBuf = await file.arrayBuffer();
const buf = Buffer.from(arrBuf);
writeFile(fullPath, buf);
return c.text("upload ok");
}
c.status(400);
return c.text("file missing");
});
const port = 3333;
console.log(`Server is running on port ${port}`);
serve({
fetch: app.fetch,
port,
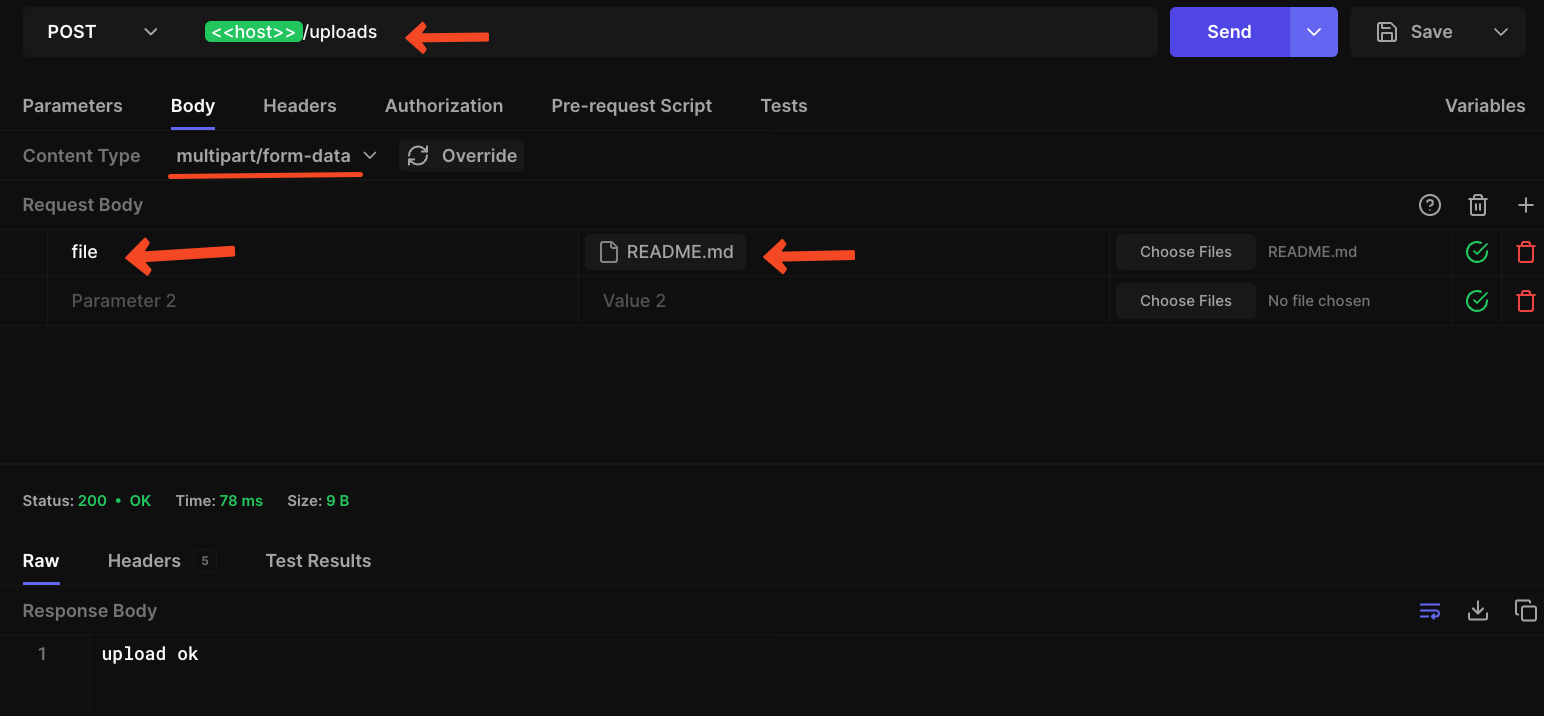
});ลองใช้ hoppscotch ทำการ upload file เข้ามา
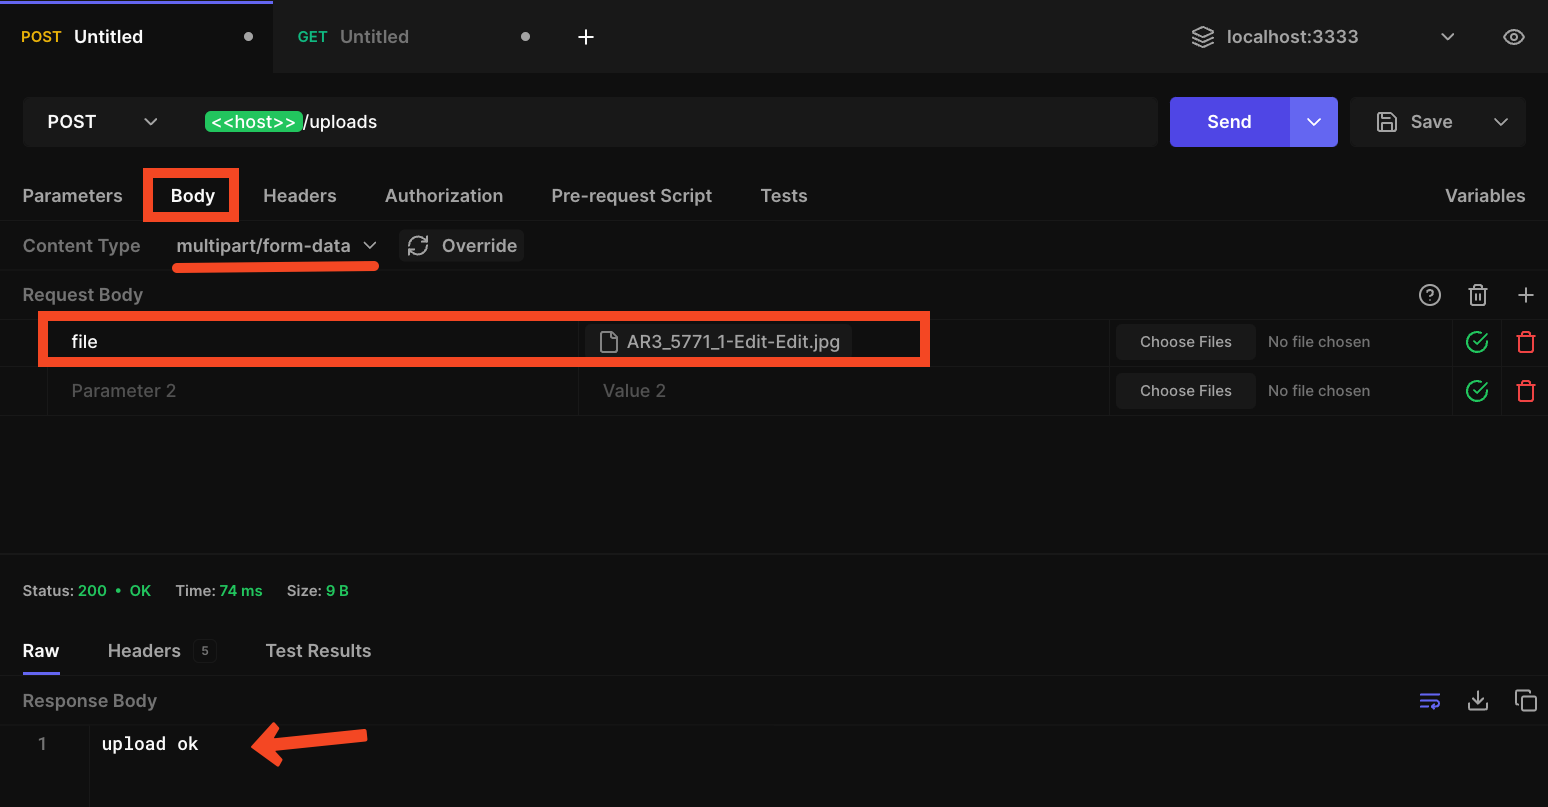
ดูที่ folder จะเห็นว่ามี file เพิ่มมาแล้ว
.
├── flake.lock
├── flake.nix
├── global.d.ts
├── package.json
├── pnpm-lock.yaml
├── README.md
├── src
│  └── index.ts
├── tsconfig.json
└── uploads
   └── AR3_5771_1-Edit-Edit.jpg
Serve static file
upload file ได้แล้ว เราก็ต้องให้คน download กลับไปได้ด้วย
ใน Hono ก็ทำได้ง่ายๆ ไม่ต้องมี lib อะไร
import { serveStatic } from "@hono/node-server/serve-static";
app.get(
"/static/*",
serveStatic({
root: "./",
rewriteRequestPath: (path) => path.replace(/^\/static/, "/uploads"),
}),
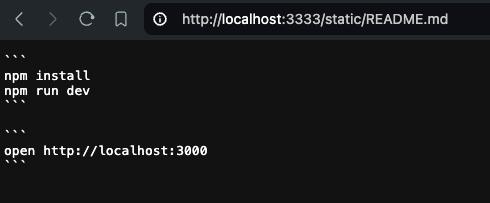
);การเรียกดู file ที่ uploads เข้ามาจะต้อง GET มาที่ http://localhost:3333/static/file-name
hono server ก็จะวิ่งไปที่ folder ./uploads/file-name
Create Dockerfile
เราได้เรียนรู้การสร้าง Dockerfile ด้วยมือไปแล้ว แต่จริงๆมันง่ายกว่านั้น Docker เขาเตรียม CLI มาให้เราแล้ว
docker initแล้วก็ใส่ ข้อมูลไปตามคำถาม
❯ docker init

Welcome to the Docker Init CLI!

This utility will walk you through creating the following files with sensible defaults for your project:
  - .dockerignore
  - Dockerfile
  - compose.yaml

Let's get started!

? What application platform does your project use? Node
? What version of Node do you want to use? 22.2.0
? Which package manager do you want to use? pnpm
? What version of pnpm do you want to use? 8.15.5
? What command do you want to use to start the app? npm run start
? What port does your server listen on? 3333

CREATED: .dockerignore
CREATED: Dockerfile
CREATED: compose.yaml

✔ Your Docker files are ready!

Take a moment to review them and tailor them to your application.

When you're ready, start your application by running: docker compose up --build

Your application will be available at http://localhost:3333
จะเห็นว่ามี files เพิ่มเข้ามาละ
.
├── .dockerignore
├── .envrc
├── .gitignore
├── compose.yaml
├── Dockerfile
├── flake.lock
├── flake.nix
├── global.d.ts
├── package.json
├── pnpm-lock.yaml
├── README.md
├── src
│  └── index.ts
├── tsconfig.json
└── uploads
   └── AR3_5771_1-Edit-Edit.jpg
ข้างในมีอะไรบ้าง ก็ตามนี้
.dockerignore
# Include any files or directories that you don't want to be copied to your
# container here (e.g., local build artifacts, temporary files, etc.).
#
# For more help, visit the .dockerignore file reference guide at
# https://docs.docker.com/engine/reference/builder/#dockerignore-file

**/.classpath
**/.dockerignore
**/.env
**/.git
**/.gitignore
**/.project
**/.settings
**/.toolstarget
**/.vs
**/.vscode
**/.next
**/.cache
**/*.*proj.user
**/*.dbmdl
**/*.jfm
**/charts
**/docker-compose*
**/compose*
**/Dockerfile*
**/node_modules
**/npm-debug.log
**/obj
**/secrets.dev.yaml
**/values.dev.yaml
**/build
**/dist
LICENSE
README.md
Dockerfile
# syntax=docker/dockerfile:1

# Comments are provided throughout this file to help you get started.
# If you need more help, visit the Dockerfile reference guide at
# https://docs.docker.com/engine/reference/builder/

ARG NODE_VERSION=22.2.0
ARG PNPM_VERSION=8.15.5

FROM node:${NODE_VERSION}-alpine

# Use production node environment by default.
ENV NODE_ENV production

# Install pnpm.
RUN --mount=type=cache,target=/root/.npm \
    npm install -g pnpm@${PNPM_VERSION}

WORKDIR /usr/src/app

# Download dependencies as a separate step to take advantage of Docker's caching.
# Leverage a cache mount to /root/.local/share/pnpm/store to speed up subsequent builds.
# Leverage a bind mounts to package.json and pnpm-lock.yaml to avoid having to copy them into
# into this layer.
RUN --mount=type=bind,source=package.json,target=package.json \
    --mount=type=bind,source=pnpm-lock.yaml,target=pnpm-lock.yaml \
    --mount=type=cache,target=/root/.local/share/pnpm/store \
    pnpm install --prod --frozen-lockfile

# Run the application as a non-root user.
USER node

# Copy the rest of the source files into the image.
COPY . .

# Expose the port that the application listens on.
EXPOSE 3333

# Run the application.
CMD npm run start
compose.yaml
# Comments are provided throughout this file to help you get started.
# If you need more help, visit the Docker compose reference guide at
# https://docs.docker.com/compose/compose-file/

# Here the instructions define your application as a service called "server".
# This service is built from the Dockerfile in the current directory.
# You can add other services your application may depend on here, such as a
# database or a cache. For examples, see the Awesome Compose repository:
# https://github.com/docker/awesome-compose
services:
  server:
    build:
      context: .
    environment:
      NODE_ENV: production
    ports:
      - 3333:3333

# The commented out section below is an example of how to define a PostgreSQL
# database that your application can use. `depends_on` tells Docker Compose to
# start the database before your application. The `db-data` volume persists the
# database data between container restarts. The `db-password` secret is used
# to set the database password. You must create `db/password.txt` and add
# a password of your choosing to it before running `docker-compose up`.
#     depends_on:
#       db:
#         condition: service_healthy
#   db:
#     image: postgres
#     restart: always
#     user: postgres
#     secrets:
#       - db-password
#     volumes:
#       - db-data:/var/lib/postgresql/data
#     environment:
#       - POSTGRES_DB=example
#       - POSTGRES_PASSWORD_FILE=/run/secrets/db-password
#     expose:
#       - 5432
#     healthcheck:
#       test: [ "CMD", "pg_isready" ]
#       interval: 10s
#       timeout: 5s
#       retries: 5
# volumes:
#   db-data:
# secrets:
#   db-password:
#     file: db/password.txt
Build Hono for Node
Hono ไม่ได้เตรียม build script มาให้เรา เพราะว่ารันไฟล์ TS ตรงๆผ่าน tsx เลย แต่เราจะ build สักหน่อยจะได้ไม่กินแรม
ติดตั้ง lib typescript ก่อน
❯ pnpm add -D typescript
Already up to date
Progress: resolved 33, reused 11, downloaded 0, added 0, done

dependencies:
- typescript ^5.5.2

devDependencies:
+ typescript ^5.5.2

Done in 495ms
จากนั้นแก้ tsconfig.json
// tsconfig.json
{
  "compilerOptions": {
    "outDir": "./dist",
    "target": "ESNext",
    "module": "ESNext",
    "moduleResolution": "Bundler",
    "strict": true,
    "skipLibCheck": true,
    "types": ["node"],
    "jsx": "react-jsx",
    "jsxImportSource": "hono/jsx"
  },
  "exclude": ["node_modules"]
}
แล้วก็เพิ่ม build script
// package.json
{
  "name": "hono",
  "type": "module",
  "scripts": {
    "dev": "tsx watch src/index.ts",
    "build": "tsc -b"
  },
  "dependencies": {
    "@hono/node-server": "^1.11.4",
    "hono": "^4.4.10"
  },
  "devDependencies": {
    "@types/node": "^20.11.17",
    "tsx": "^4.7.1",
    "typescript": "^5.5.2"
  },
  "packageManager": "pnpm@8.15.5+sha1.a58c038faac410c947dbdb93eb30994037d0fce2"
}
Dockerfile
เราจะมาแก้ Dockerfile กัน
# syntax=docker/dockerfile:1
ARG NODE_VERSION=22.2.0
ARG PNPM_VERSION=8.15.5

# Build
FROM node:${NODE_VERSION}-alpine AS build

ENV NODE_ENV production

# Install pnpm.
RUN --mount=type=cache,target=/root/.npm \
  npm install -g pnpm@${PNPM_VERSION}


WORKDIR /app

RUN --mount=type=bind,source=package.json,target=package.json \
  --mount=type=bind,source=pnpm-lock.yaml,target=pnpm-lock.yaml \
  --mount=type=cache,target=/root/.local/share/pnpm/store \
  pnpm install --frozen-lockfile

COPY . .

RUN pnpm run build && pnpm prune --prod

# Final
FROM node:${NODE_VERSION}-alpine AS runner

ENV NODE_ENV=production
WORKDIR /app

RUN mkdir -p ./uploads
RUN chown -R node ./uploads
RUN chmod 700 ./uploads

COPY --from=build  /app/dist ./dist
COPY --from=build  /app/node_modules ./node_modules
COPY --from=build  /app/package.json ./package.json

USER node

EXPOSE 3333

CMD npm run start
CMD ["node", "dist/index.js"]
Build docker image
docker build -t hono .❯ docker build -t hono .
[+] Building 6.7s (22/22) FINISHED docker:orbstack
=> [internal] load build definition from Dockerfile 0.1s
=> => transferring dockerfile: 916B 0.0s
=> resolve image config for docker-image://docker.io/doc 2.3s
=> [auth] docker/dockerfile:pull token for registry-1.do 0.0s
=> CACHED docker-image://docker.io/docker/dockerfile:1@s 0.0s
=> [internal] load metadata for docker.io/library/node:2 2.4s
=> [auth] library/node:pull token for registry-1.docker. 0.0s
=> [internal] load .dockerignore 0.1s
=> => transferring context: 672B 0.0s
=> [build 1/6] FROM docker.io/library/node:22.2.0-alpine 0.0s
=> [internal] load build context 0.1s
=> => transferring context: 550B 0.0s
=> CACHED [runner 2/8] WORKDIR /app 0.0s
=> [runner 3/8] RUN mkdir -p ./uploads 0.3s
=> CACHED [build 2/6] RUN --mount=type=cache,target=/roo 0.0s
=> CACHED [build 3/6] WORKDIR /app 0.0s
=> CACHED [build 4/6] RUN --mount=type=bind,source=packa 0.0s
=> CACHED [build 5/6] COPY . . 0.0s
=> CACHED [build 6/6] RUN pnpm run build && pnpm prune - 0.0s
=> [runner 4/8] RUN chown -R node ./uploads 0.3s
=> [runner 5/8] RUN chmod 700 ./uploads 0.3s
=> [runner 6/8] COPY --from=build /app/dist ./dist 0.1s
=> [runner 7/8] COPY --from=build /app/node_modules ./n 0.2s
=> [runner 8/8] COPY --from=build /app/package.json ./p 0.1s
=> exporting to image 0.3s
=> => exporting layers 0.2s
=> => writing image sha256:05d88658b6d798e9e18fac006f8ee 0.0s
=> => naming to docker.io/library/hono 0.0sRun docker container
docker run -p 3333:3333 --name hono -d honoTry to upload file
ก็ลอง upload file เล่นๆกันได้
แล้วลองเปิดดูที่ http://localhost:3333/static/file-name
Add one more route
ก่อนจะจบตรงนี้ขอเพิ่ม route อีกอันนึง
app.get("/users", (c) =>
  c.json(
    // return users
    {
      users: [
        {
          name: "John",
          age: 41,
        },
        {
          name: "Joceph",
          age: 62,
        },
      ],
    },
    200, // status code
  ),
);