Hands-on SSR using Next
Installation
pnpx create-next-app@latest❯ pnpx create-next-app@latest
Packages: +1
+
Progress: resolved 1, reused 0, downloaded 1, added 1, done
✔ What is your project named? … next
✔ Would you like to use TypeScript? … No / Yes
✔ Would you like to use ESLint? … No / Yes
✔ Would you like to use Tailwind CSS? … No / Yes
✔ Would you like to use `src/` directory? … No / Yes
✔ Would you like to use App Router? (recommended) … No / Yes
✔ Would you like to customize the default import alias (@/*)? … No / Yes
Creating a new Next.js app in /Users/atiwatseenark/Desktop/next/next.
Using pnpm.
Initializing project with template: app-tw
Installing dependencies:
- react
- react-dom
- next
Installing devDependencies:
- typescript
- @types/node
- @types/react
- @types/react-dom
- postcss
- tailwindcss
- eslint
- eslint-config-nextfiles และ folders ที่ได้
.
├── flake.lock
├── flake.nix
├── global.d.ts
├── next-env.d.ts
├── next.config.mjs
├── package.json
├── pnpm-lock.yaml
├── postcss.config.mjs
├── public
│  ├── next.svg
│  └── vercel.svg
├── README.md
├── src
│  └── app
├── tailwind.config.ts
└── tsconfig.json
edit home page
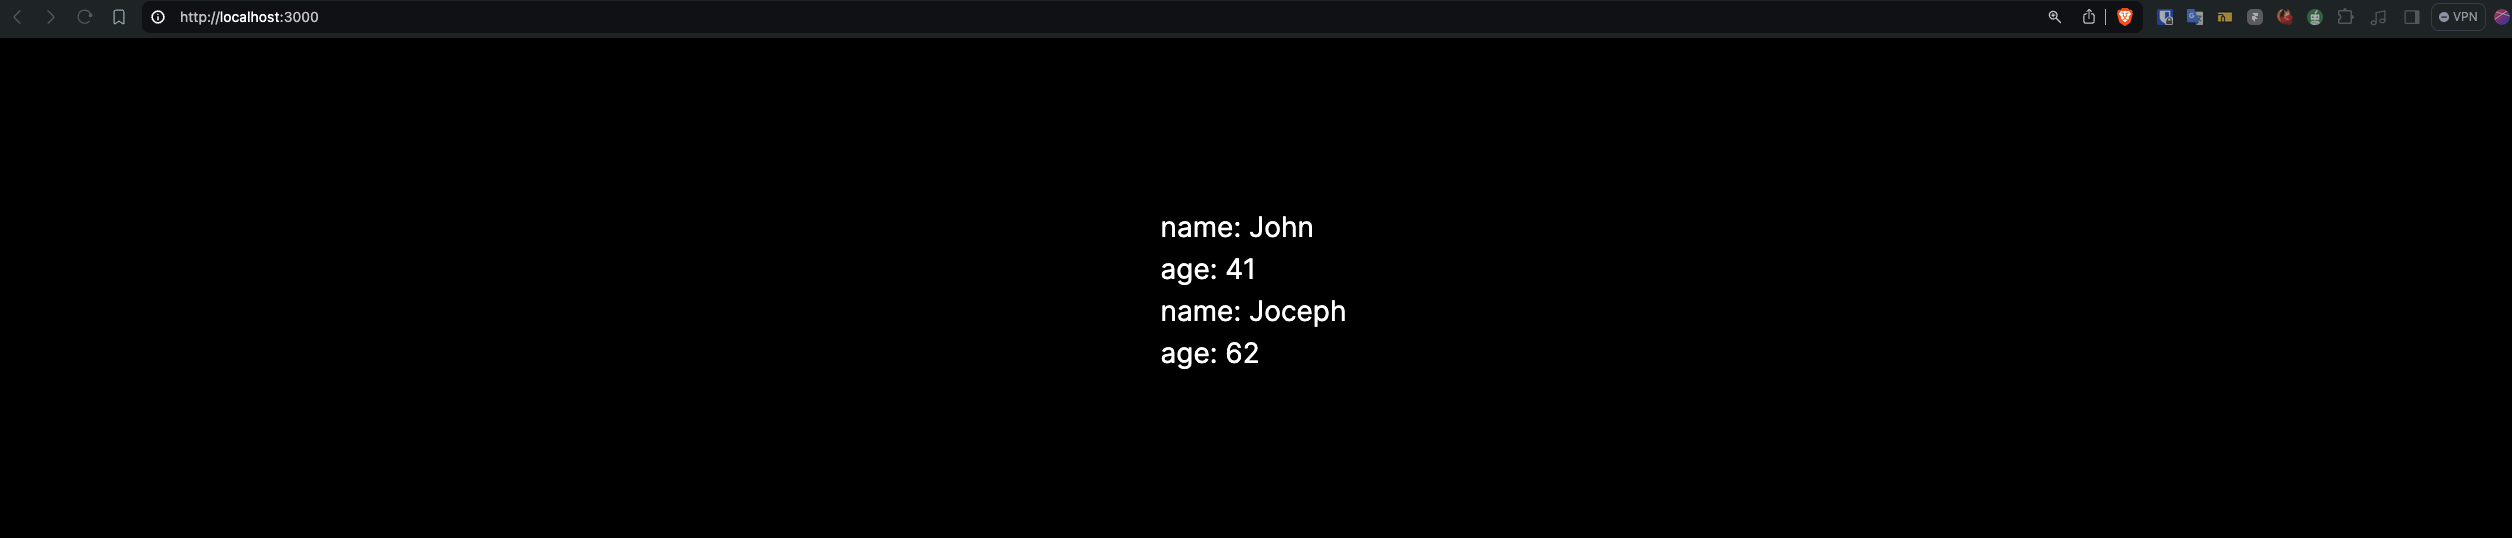
เราจะเรียก GET /users จาก api ที่ทำไว้
const getUsers = () =>
  fetch("http://localhost:3333/users").then(
    (res) => res.json() as Promise<{ users: { name: string; age: number }[] }>,
  );

export default async function Home() {
  const users = await getUsers();
  return (
    <main className="flex min-h-screen flex-col items-center justify-between p-24">
      <ul>
        {users.users.map((usr) => (
          <li key={usr.name}>
            <p>name: {usr.name}</p>
            <p>age: {usr.age}</p>
          </li>
        ))}
      </ul>
    </main>
  );
}

export const dynamic = "force-dynamic";
จะเห็นว่าใส่ export const dynamic = "force-dynamic" เพื่อบังคับให้เป็น SSR แทนที่จะเป็น SSG
Dockerfile
ใน Nextjs ง่ายมากๆ เขาทำมาให้หมดแล้วดีแล้วด้วย
ไป copy ได้ที่ link นี้
แต่ก่อนจะไป copy เราจะต้องแก้ next.config.js ก่อน
/** @type {import('next').NextConfig} */
const nextConfig = {
  output: "standalone",
};

export default nextConfig;
ให้เรารัน docker init ก่อน
docker initแล้วก็ copy Dockerfile จาก link ที่ให้ไป มาวางทับได้เลย
FROM node:18-alpine AS base

# Install dependencies only when needed
FROM base AS deps
# Check https://github.com/nodejs/docker-node/tree/b4117f9333da4138b03a546ec926ef50a31506c3#nodealpine to understand why libc6-compat might be needed.
RUN apk add --no-cache libc6-compat
WORKDIR /app

# Install dependencies based on the preferred package manager
COPY package.json yarn.lock* package-lock.json* pnpm-lock.yaml* ./
RUN \
  if [ -f yarn.lock ]; then yarn --frozen-lockfile; \
  elif [ -f package-lock.json ]; then npm ci; \
  elif [ -f pnpm-lock.yaml ]; then corepack enable pnpm && pnpm i --frozen-lockfile; \
  else echo "Lockfile not found." && exit 1; \
  fi


# Rebuild the source code only when needed
FROM base AS builder
WORKDIR /app
COPY --from=deps /app/node_modules ./node_modules
COPY . .

# Next.js collects completely anonymous telemetry data about general usage.
# Learn more here: https://nextjs.org/telemetry
# Uncomment the following line in case you want to disable telemetry during the build.
# ENV NEXT_TELEMETRY_DISABLED 1

RUN \
  if [ -f yarn.lock ]; then yarn run build; \
  elif [ -f package-lock.json ]; then npm run build; \
  elif [ -f pnpm-lock.yaml ]; then corepack enable pnpm && pnpm run build; \
  else echo "Lockfile not found." && exit 1; \
  fi

# Production image, copy all the files and run next
FROM base AS runner
WORKDIR /app

ENV NODE_ENV production
# Uncomment the following line in case you want to disable telemetry during runtime.
# ENV NEXT_TELEMETRY_DISABLED 1

RUN addgroup --system --gid 1001 nodejs
RUN adduser --system --uid 1001 nextjs

COPY --from=builder /app/public ./public

# Set the correct permission for prerender cache
RUN mkdir .next
RUN chown nextjs:nodejs .next

# Automatically leverage output traces to reduce image size
# https://nextjs.org/docs/advanced-features/output-file-tracing
COPY --from=builder --chown=nextjs:nodejs /app/.next/standalone ./
COPY --from=builder --chown=nextjs:nodejs /app/.next/static ./.next/static

USER nextjs

EXPOSE 3000

ENV PORT 3000

# server.js is created by next build from the standalone output
# https://nextjs.org/docs/pages/api-reference/next-config-js/output
CMD HOSTNAME="0.0.0.0" node server.js
Build docker image for Nextjs
docker build -t next .Run container
docker run --name next -p 3000:3000 -d nextแต่เมื่อเราเปิดไปที่หน้าเวป มันจะ Error

เราจะต้องเข้าไปดู log
Docker log
อยากให้ focus กับวิธีการดู log ที่จะเกิดขึ้นใน container ก่อนนะ
docker container logs next❯ docker container logs next
▲ Next.js 14.2.4
- Local: http://localhost:3000
- Network: http://0.0.0.0:3000
✓ Starting...
✓ Ready in 37ms
TypeError: fetch failed
at node:internal/deps/undici/undici:12618:11
at process.processTicksAndRejections (node:internal/process/task_queues:95:5)
at async o (/app/.next/server/app/page.js:6:29101) {
cause: Error: connect ECONNREFUSED ::1:3333
at TCPConnectWrap.afterConnect [as oncomplete] (node:net:1555:16)
at TCPConnectWrap.callbackTrampoline (node:internal/async_hooks:128:17) {
errno: -111,
code: 'ECONNREFUSED',
syscall: 'connect',
address: '::1',
port: 3333
},
digest: '3571952263'
}
TypeError: fetch failed
at node:internal/deps/undici/undici:12618:11
at process.processTicksAndRejections (node:internal/process/task_queues:95:5)
at async o (/app/.next/server/app/page.js:6:29101) {
cause: Error: connect ECONNREFUSED ::1:3333
at TCPConnectWrap.afterConnect [as oncomplete] (node:net:1555:16)
at TCPConnectWrap.callbackTrampoline (node:internal/async_hooks:128:17) {
errno: -111,
code: 'ECONNREFUSED',
syscall: 'connect',
address: '::1',
port: 3333
},
digest: '3571952263'
}เราจะเห็น log ที่เกิดขึ้นไปก่อนหน้านี้แล้ว เท่านั้น
ถ้าเราอยากดู log ที่เกิดขึ้นมาเรื่อยๆ แบบว่าอยากเฝ้า ก็ให้เพิ่ม flag -f มาจาก follow อะนะ
docker container logs -f nextSolve connection the problems
ทีนี้มาแก้ปัญหากัน จาก log ที่เจอ บอกเราถึงปัญหาเรื่อง connection ตัว Next app มันหา backend ของเราไม่เจอ
ทำไมถึงหาไม่เจอ ต้องมาทำความเข้าใจเรื่อง network กับ container กันก่อน
ตอนนี้เรามี container อยู่ 2 ตัว และมีการ binding ports ตามภาพนี้
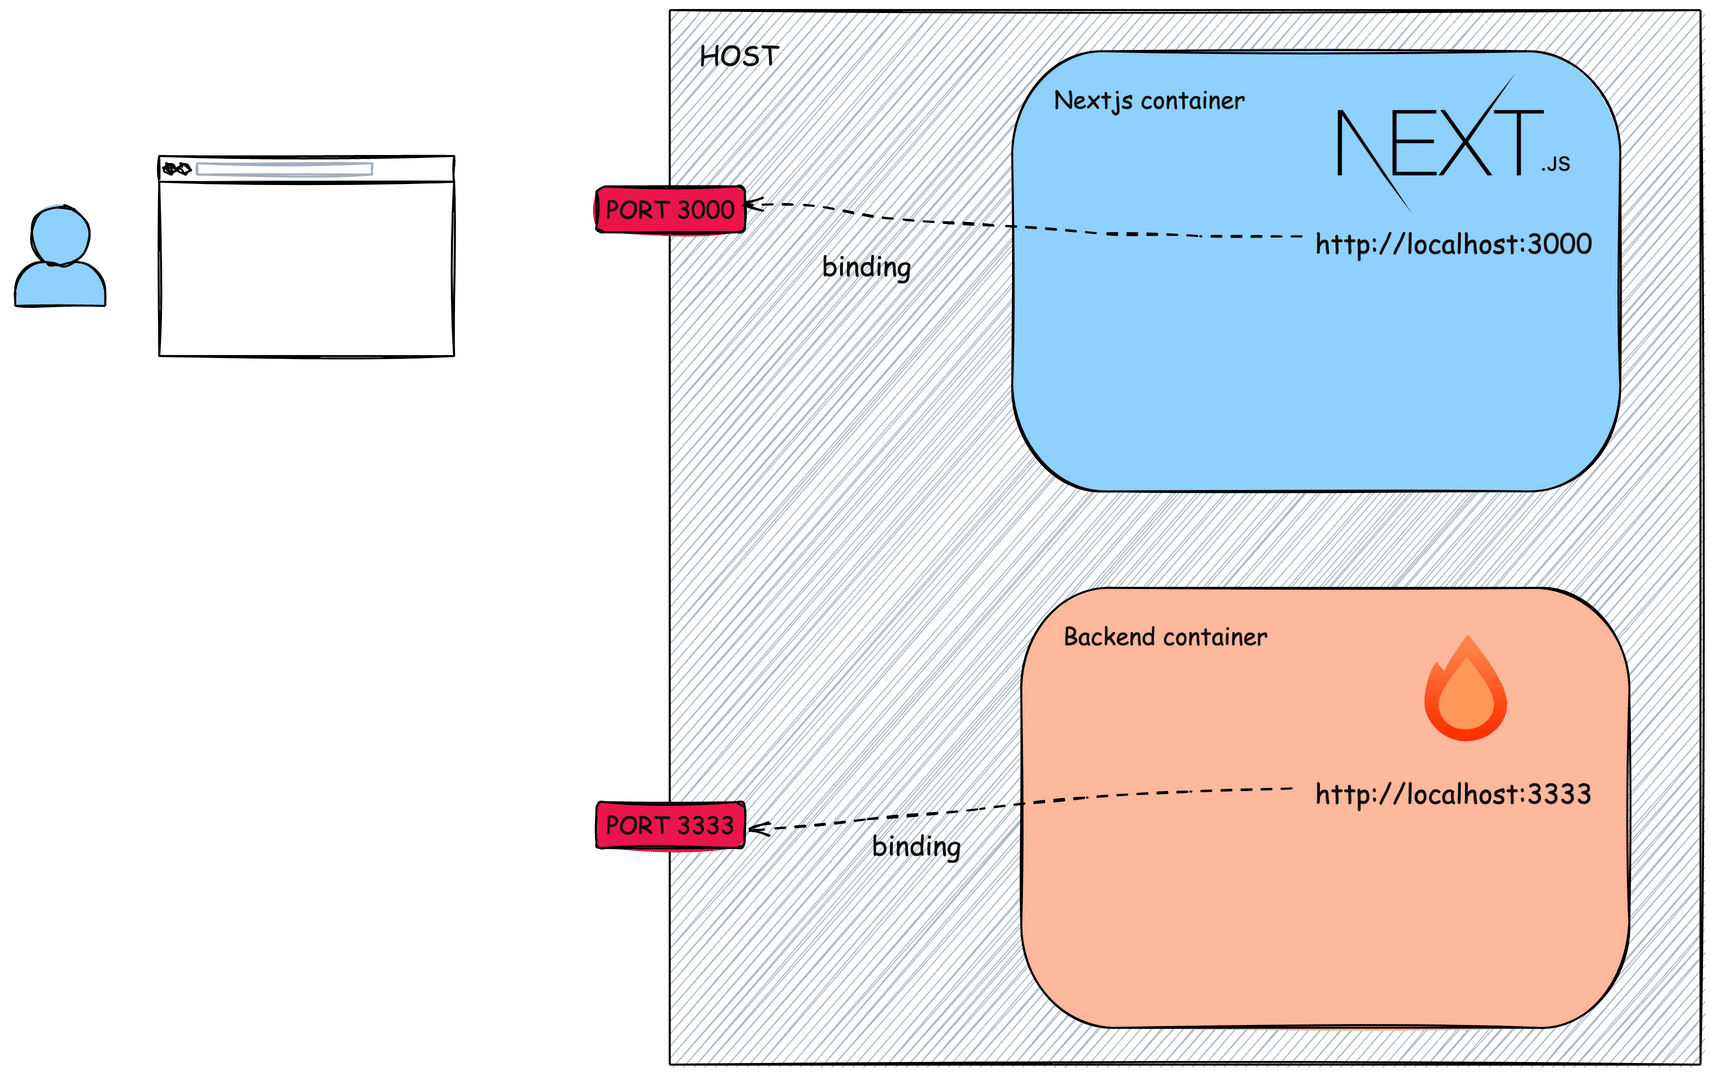
จากนั้นเมื่อมี Request จาก User เข้ามา Nextjs ก็จะเรียกไปที่ http://localhost:3333/users เพื่อขอข้อมูล users มาจากนั้น Nextjs ก็จะเอามา Render ก่อนส่ง html กลับไปให้ user
แต่เนื่องจากว่า url มันเป็น localhost ฉนั้น Nextjs container มันก็เลยไปมองหา port 3333 ภายใน container ตัวเองซึ่งมันไม่มี ตรงนี้ก็เลยเกิด error ขึ้นมา เนื่องจากว่า container เป็นเหมือน computer เครื่องหนึ่งการบอกให้ request ไปที่ localhost มันก็เหมือน request วนอยู่ที่เครื่องตัวเอง ก็เลยหาไม่เจอ เพราะว่า backend อยู่ในอีก container หนึ่ง เหมือนกับว่าอยู่ในคอมอีกเครื่องหนึ่งนั่นเอง
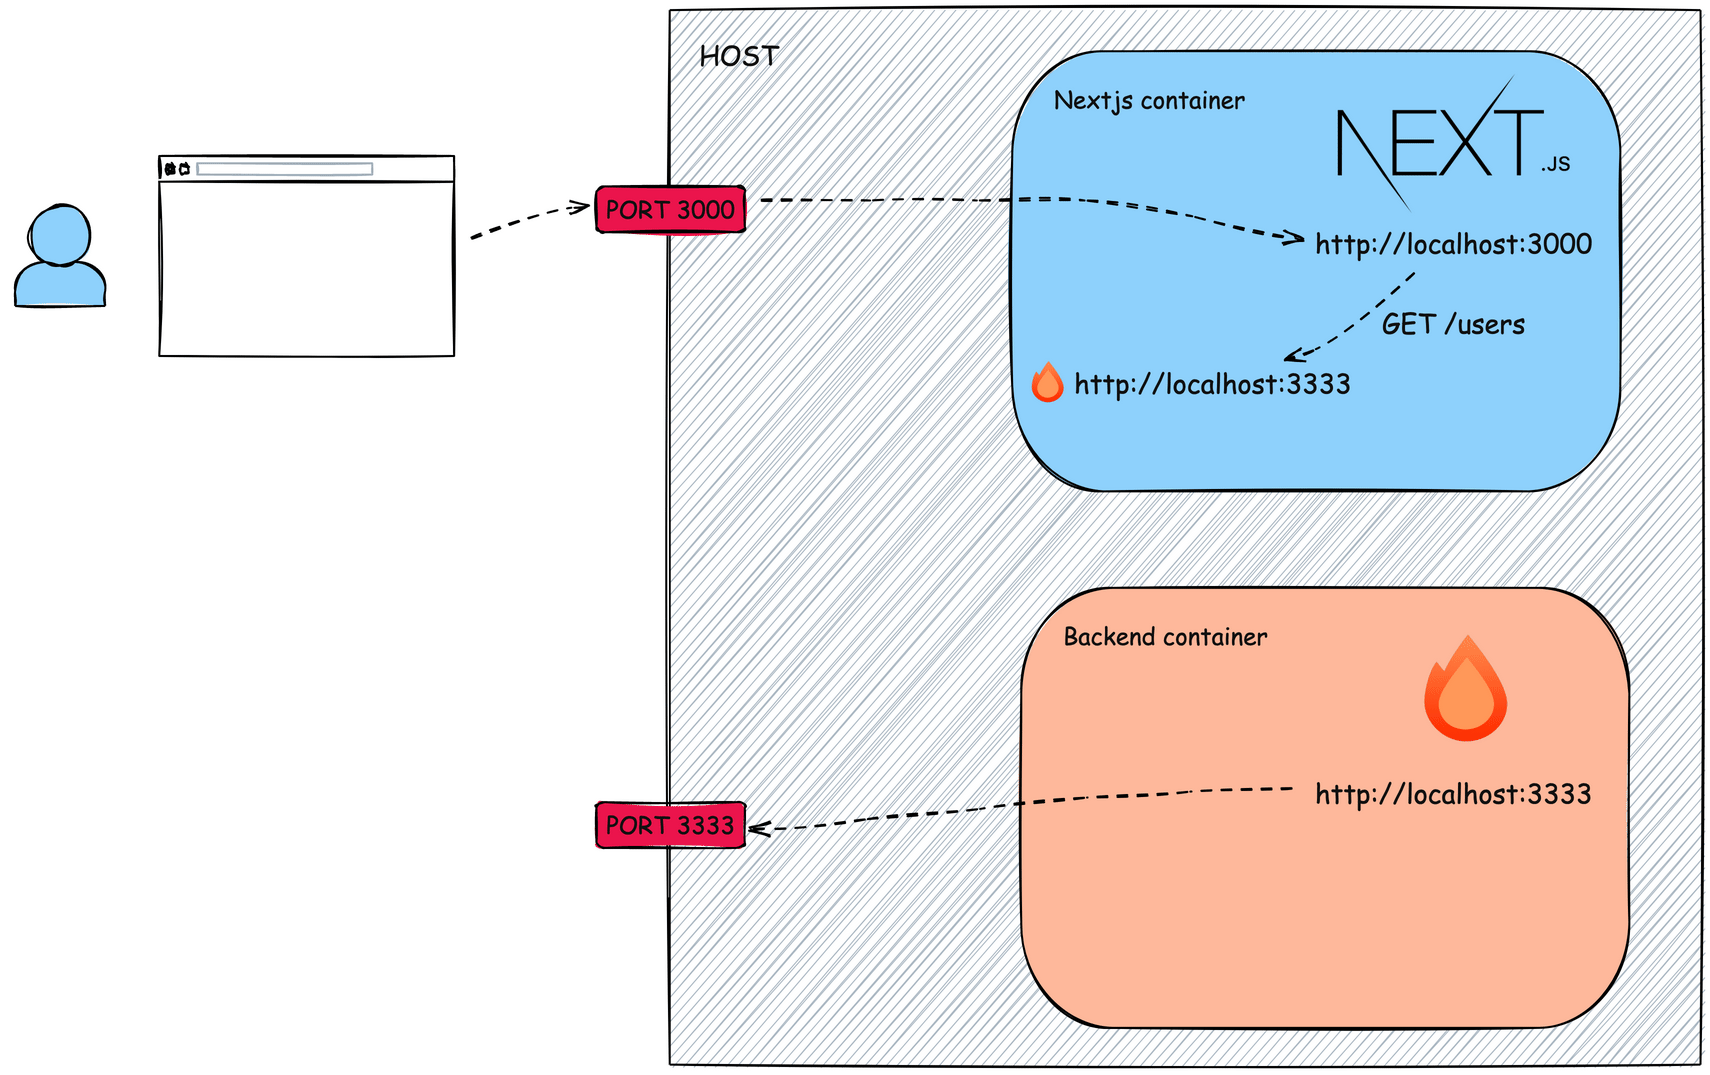
ฉนั้นการแก้ปัญหาตรงนี้เราจะต้อง request ออกมาด้านนอกที่ HOST:3333 แล้วเอา data ที่ได้ไป render
เราจะต้องเปลี่ยน url ให้เป็น http://host.docker.internal:3333 แทน
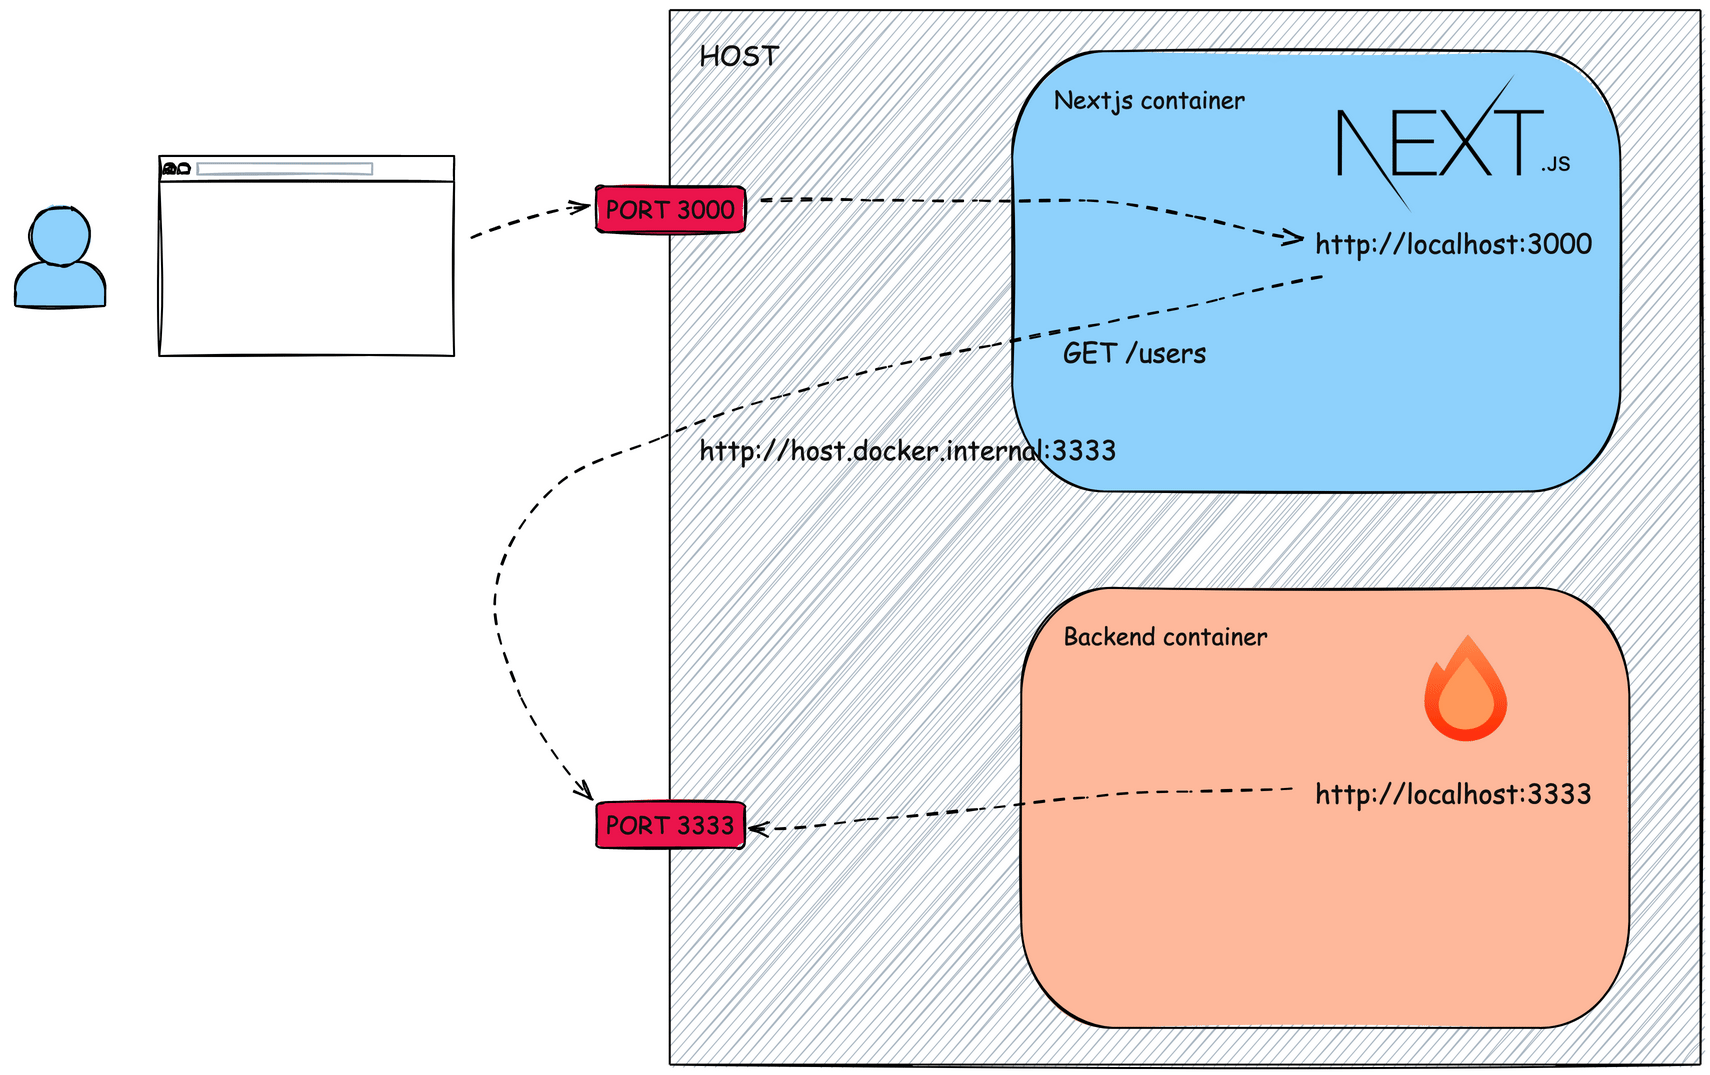
ก็ แก้ url ตรงนี้ hard code ไปก่อนละกัน ไม่อยากเสียเวลาอธิบายเรื่อง env
const getUsers = () =>
  fetch("http://host.docker.internal:3333/users").then(
    (res) => res.json() as Promise<{ users: { name: string; age: number }[] }>,
  );

export default async function Home() {
  const users = await getUsers();
  return (
    <main className="flex min-h-screen flex-col items-center justify-between p-24">
      <ul>
        {users.users.map((usr) => (
          <li key={usr.name}>
            <p>name: {usr.name}</p>
            <p>age: {usr.age}</p>
          </li>
        ))}
      </ul>
    </main>
  );
}

export const dynamic = "force-dynamic";
ลอง build แล้ว run อีกครั้งนึง
รอบนี้เปิดหน้าเวปมาจะไม่มี error ละ